Share this
by SyncShow on Thu, Feb 12, 2015 @ 09:08
The visual age is upon us. Society is rapidly converting from verbal and written communication to visual platforms. Whether this conversion is a result of an increasingly lazy society or simply the lack of time to process lengthy articles, people are more apt to watch a video because all the information is provided with minimal effort on the viewer’s part.
Looking to join the movement toward visual platforms? Instead of just jumping right in with a huge splash, follow these six iMovie tips for a graceful transition.
To start, open the iMovie application by clicking the icon. Under “File,” click “New Project.” This gives you a working dashboard to drag in clips to create your project. To import material, click on “File.” You will notice there is an “Import from Camera…” button and an “Import” button. The first allows you to film live from your webcam. The second allows you to import film from other devices, such as cameras, phones, CDs, and USBs. This material will be imported into an Event. From here, you can select what film you would like to drag into your New Project dashboard. Now that you have your material, let’s get started!
1. Add Titles

Adding titles to your video creates a professional introduction for your subject. iMovie offers several title formats to choose from. Some are slides with movement, while others are static. To insert a title slide, simply click on the title button labeled “T” on the right-hand side. Then, drag the title slide into your project. If you want it to overlay video, drop the title slide on top of the desired video content.
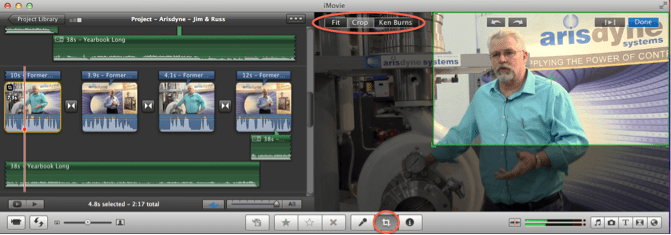
2. Crop the View for a Different Look

Being adequate in a movie editing application is hard enough. Do not stress on the expertise of actually filming. When you are editing your film, create different views by cropping the scene instead of raw shooting from different angles. First, click on the desired clip. Click the crop icon button. Here, you can crop the frame of the scene, allowing for a new perspective. You can even experiment with the “Ken Burns” effect which zooms across the selected clip from the “start” box to the “end” box. This gives your viewers the impression that you are a filming expert!
3. Detach the Audio

Don’t you hate it when your video does not run smoothly together because you wanted to exclude some material and now you’re left with choppy spliced clips? Try detaching the audio and overlay it on an image (an image can be dragged into your project board just like a video clip). To detach the audio, right click on the clip and select “Detach Audio.” You will now see a purple slide that represents the audio. From here, you can delete the actual video and overlay the purple audio on other material.
Tip: If you think the static image with overlaid audio looks out of place, create a Ken Burns crop on the image. This creates the illusion that it is actually a video.
4. Transitions

Similar to PowerPoint, transitions in iMovie can be distracting if used improperly. In order to produce a quality video, always start and end with a transition. This signals to your audience a smooth introduction and conclusion. In between clips, I recommend the “cross dissolve” transition. This is always my go-to because it does not detract from your content and offers a smooth transition.
5. Reduce Background Noise

Once again, creating a professional film in iMovie does not require being a filming expert. When you are filming, the microphone from your camera will pick up unneeded noise. iMovie can eliminate that. When you scroll over the desired clip, click on the settings drop-down box that appears on the clip. Select “Audio Adjustments.” A panel will appear with several audio adjustment options. Adjust the dial under “Reduce Background Noise by:” until you reach the appropriate percentage (I normally go with 40%). By reducing the background noise, viewers will not be distracted by other sounds and can focus on the targeted content.
6. Export Your Work

Let’s share that masterpiece! iMovie allows you to export your work to multiple platforms. Popular platforms include YouTube, Facebook, Final Cut Pro, QuickTime, and iTunes. You can also export it to a USB or your desktop. Once your project is complete, click “Share” on the main toolbar and click where you would like your work exported.
Creating video can seem daunting, but following these six simple tips in iMovie will make you look like a pro!

Mikayla Zernic was an Inbound Marketing Intern at SyncShow throughout December 2014 and January 2015. She studies communication studies and marketing in interactive media and social media at Ohio University. Taking pictures, relaxing at the beach, playing volleyball, and being surrounded by family and friends are among her favorite hobbies. Read more about her intern experience here.
Top image courtesy of zirconicusso via FreeDigitalPhotos.net